
Fall is here! And along with it comes cooler weather, shorter days, and the urge to bake ALL the things; namely all the Pumpkin Spice things! Today however, we will be cooking up an oven mitt. Not quite as tasty as say, pumpkin muffins but it will help you in your actual baking later. So without further ramblings, I give you my Easy Oven Mitt Tutorial!
For this recipe you will need:
Your main fabric- 2 pieces measuring 9 x 11 inches
Cotton Batting- Also 2 pieces (one for front side and one for back) 9 x 11
Insulbright- You guessed it, 2 pieces both measuring 9 x 11 (see how easy this is already!)
Accent trim fabric- measuring 2-1/2 by 14 inches, folded in half length wise and ironed.
And of course the usual- thread, scissors, sewing machine, and minimal sewing experience.
Print out my Easy Oven Mitt Template HERE (personal use only, thanks!) and cut template out. I find it best to use card stock as it will last longer if you plan on making a few of these babies.

Layer your 9 x 11’s in this order (top picture), Cotton batting, Insulbright, and your main fabric. Repeat with second set of 9 x 11’s. Next, cut out mitt shape for both your front and back side of mitt making SURE to flip the template once so you don’t end up with a mismatched hand shape! I am supper lazy (or genius) and use my rotary cutter to cut around the template.
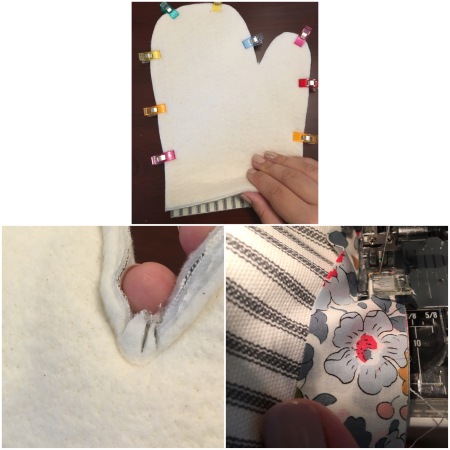
Once you have your two sides cut out, place them together with right sides facing (top picture) and clip. Using a generous 1/4 inch seam allowance sew around mitt leaving just the bottom open. Next, make three small snips in the corner of the thumb (bottom left picture) making sure to not clip through your seam line. Zig zag stitch around the mitt (not the bottom) so you have a nice clean inside. Turn right side out using a turning tool to get the thumb out (I use an extra large knitting needle). Attach your accent fabric as you would any binding, just think of it as a very tiny strip of binding! You know the drill: raw edges aligned, tuck your binding tail when you finish, fold over edge of mitt and clip, then stitch in the ditch on the front making sure to catch the trim on the back as well. Just give a shout if you need any help!
Now you have a complete oven mitt!
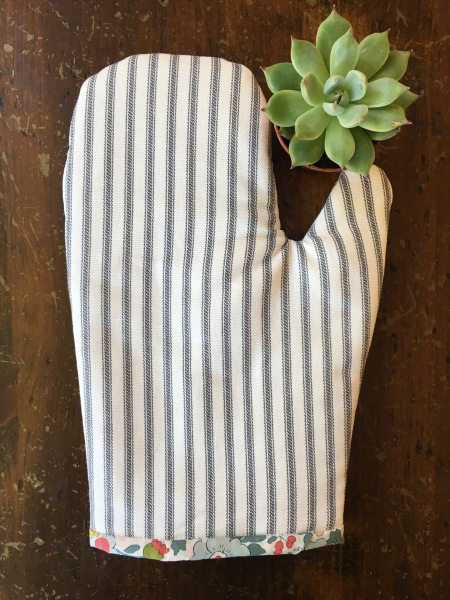
I should mention that this mitt is a smaller fitting one. For years I never used my mitts because they were so big and always got in the way when baking, nothing worse than a over sized oven mitt thumb print in the edge of a nice pie crust or not having a good grip on a massive pot of boiling water! I had all but given up on oven mitts until my sister-in-law gave me a smaller one a couple years ago. That poor mitt is so ratty and used now. I absolutely love its smaller size and snug fit.

Now you may think I was lazy again or forgot to line my mitt, and as nice as it looks to have a lining; I left it out on purpose. I tried lining on my first one but I just couldn’t get a good grip with that lining, so I have left it with the cotton batting on the inside. Not only is it soft and fluffy but also helps you get a good grip which is ideal when you are a serious baker/cooker like I am 😉

Make one or two for yourself or as gifts for friends (dare I say Christmas yet?). These are so fun that I’ve made a few as gifts, and I *might* even have a few listed in my Etsy shop in the next couple days. Feel free to Pin it for future reference, tag me on Instagram or Facebook when you make your own and use the #easyovenmitt hashtag so we can all see.
Thanks for stopping by and have a wonderful week!


September 28, 2016 at 9:39 pm |
Faith, great tutorial! You made it look super easy, so I guess I’m going to give it a try! I make pot holders all the time for gifts, but haven’t had the greatest success with mitts. So…. this one is on my to-do list!
– Dori @redfeedsack –
September 30, 2016 at 10:50 am |
Can you get the thumb area to not wrinkle? Love it
October 2, 2016 at 3:31 pm |
[…] Loving this oven mitt tutorial from Sarana Ave – the perfect last minute gift. Click here to get the tutorial. […]
October 5, 2016 at 9:55 pm |
Thank you for the tutorial Faith! I’ve never made an oven mitt. I will give it a try! Thanks again!!
January 20, 2021 at 2:47 am |
Weight Loss Guaranteed